How to Upload .apk File in Webhost
Android Studio allows yous to create two kinds of APK files.
Start are the debug APK files that are generated solely for testing purposes. They will run on your Android mobile. Still, they cannot exist uploaded to the Play Store or made available to the public.
Secondly, you can generate signed APK files. Signed APK files come up in handy when you've tested your application and information technology is set to be uploaded on the Play Store and released to the general public.
This tutorial will show yous how to create an Android app by generating APK files using Android Studio.
First things starting time: open up a project file in Android Studio. If you don't have a project file even so, simply create a New Project.
-


Android SDK
How to Make Android Apps for Beginners
Creating an APK file
Generating a debug APK file is like shooting fish in a barrel and is a affair of just a few clicks.
First, open upwards your project or awarding that you want to import into an APK file. Then, select Build > Build Bundle(southward)/APK(south) > Build APK(s)from the toolbar menu.


Android Studio will take a few moments to generate an APK file.
Once the APK build is consummate, you'll receive a notification on the bottom right corner of your screen. From that notification, select Locate and yous volition exist led to the APK file location.


If you miss the notification, you can still locate the APK file in the following path within your projection folder: app/build/outputs/apk/debug. The file is named app-debug.apk by default.
Creating a Signed APK File
To generate a signed APK file, open the Build menu from the toolbar and select Generate Signed Parcel/APK.
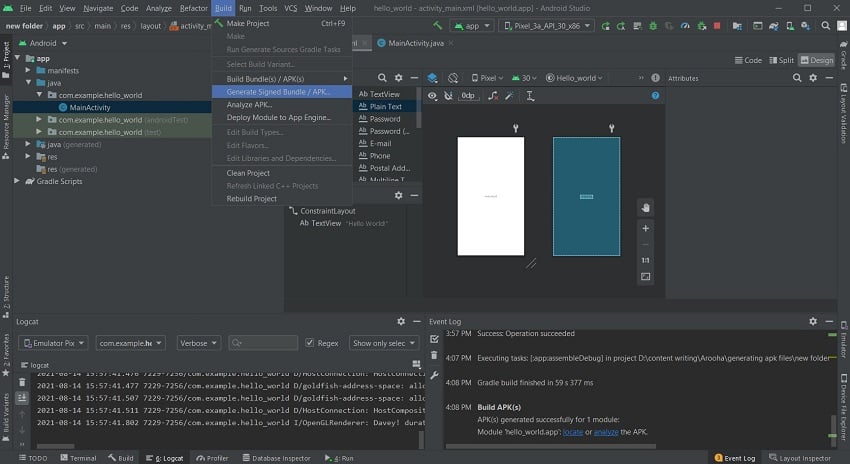


This opens up a screen where y'all accept to select between creating an Android App Bundle and creating an APK file. Check the APK radio button and proceed to the next window.


In the next window, yous volition be shown the module (your application) for which the APK file is being generated. You'll be asked nigh your Fundamental store path, Key store countersign, Central allonym, and the Cardinal password.


Creating a New Fundamental Shop
Bold that this is the first time you're creating a Signed APK file, you lot will take to create a new key store.
Keys are used past the programmer to admission their application in one case it has been uploaded to the Play Shop. The demand for the keys commonly arises when yous have to update your application. All of the keys are stored in the key shop.
Both the key store and the keys are protected by passwords of their ain. The passwords should be at least six characters in length. Also, it is a good practice to go along multiple copies of your keys since they are your simply gateway to your application. If the key is lost, you will non be able to access your application or update it.
Creating your own app requires you to create a new key store. To do so, select Create new. You volition find information technology underneath the input field where you enter the key shop path.


Yous volition then be redirected to a new window.


In the new window, enter the path for your new primal shop, and then enter a password to protect it.
In the same window, you will as well exist setting a new key for your application. Enter an identity for your key in the primal allonym field and then enter a password for it.
Y'all tin can continue the aforementioned password every bit that of your fundamental store, but it's a expert practise to give a new password to each of your keys. The same goes for the key allonym.
The next field defines the validity of your application. This is the duration afterward which the key to your application will expire, leaving your application inaccessible. The default validity for a primal is 25 years.
For each key that you generate, you're given a certificate that contains all the information nearly yous and your company. You don't necessarily have to fill in all the details—just choose the ones you think should go on your certificate. A central will however be generated, even without filling in each field of the certificate.
Finishing Up
Once yous have filled in the details for the certificate, select OK. You will then exist directed back to the Generate Signed Package or APK screen.
Hither, all of the fields volition at present be pre-filled for you. Go through all the details to stay on the prophylactic side. Then, select Side by side.


On the last screen, y'all will now exist able to see the destination of your Signed APK file. Below that, you volition see two more options: Debugand Release.
Debugging is used when the application is still in the testing phase. Since your application has passed the testing phase and is set for deployment, select Release.
At that place are 2 more checkboxes towards the bottom of the screen. Select V2 (Full APK Signature) and click Finish.


You will be notified by Android Studio once the APK build is finished. Now, yous can click on Locate from the notification to open up up the file location.
The Signed APK file is named app-release.apk by default. You will find information technology in your projection folder in the app/release directory.
Summary
These are the steps yous need to follow to generate APK and Signed APK files for the purposes of testing your app and making it downloadable via Google Play respectively:
Create an APK File
- Create the project in Android Studio.
- Select Build > Build Parcel(due south)/APK(s) > Build APK(due south)from the toolbar menu.
Yous can now transfer your debug APK file to your Android mobile telephone and test it for bugs. You can also exam it out on your PC using the Android emulator.
Create a Signed APK File
- Create the project in Android Studio.
- Select Build > Signed Packet/APK from the toolbar menu.
- Configure the settings for your APK file and maybe create a new key store and central.
Create a New Key Shop and Key
- Select a key store path.
- Enter a countersign for your cardinal store.
- Give your primal an identity, validity menses, and countersign.
- Enter any personal or organizational details you want included in the key document.
You can now release this signed APK file to the public by publishing it on Google Play Store.
Easy just tricky, right? Hopefully, this tutorial helped to clear up any confusion you lot had about generating APK and signed APK files and bettered your understanding of both file types.
juarezcoatseardeas.blogspot.com
Source: https://webhosting-reviews.org/how-to-generate-apk-and-signed-apk-files-in-android-studio/
0 Response to "How to Upload .apk File in Webhost"
Postar um comentário